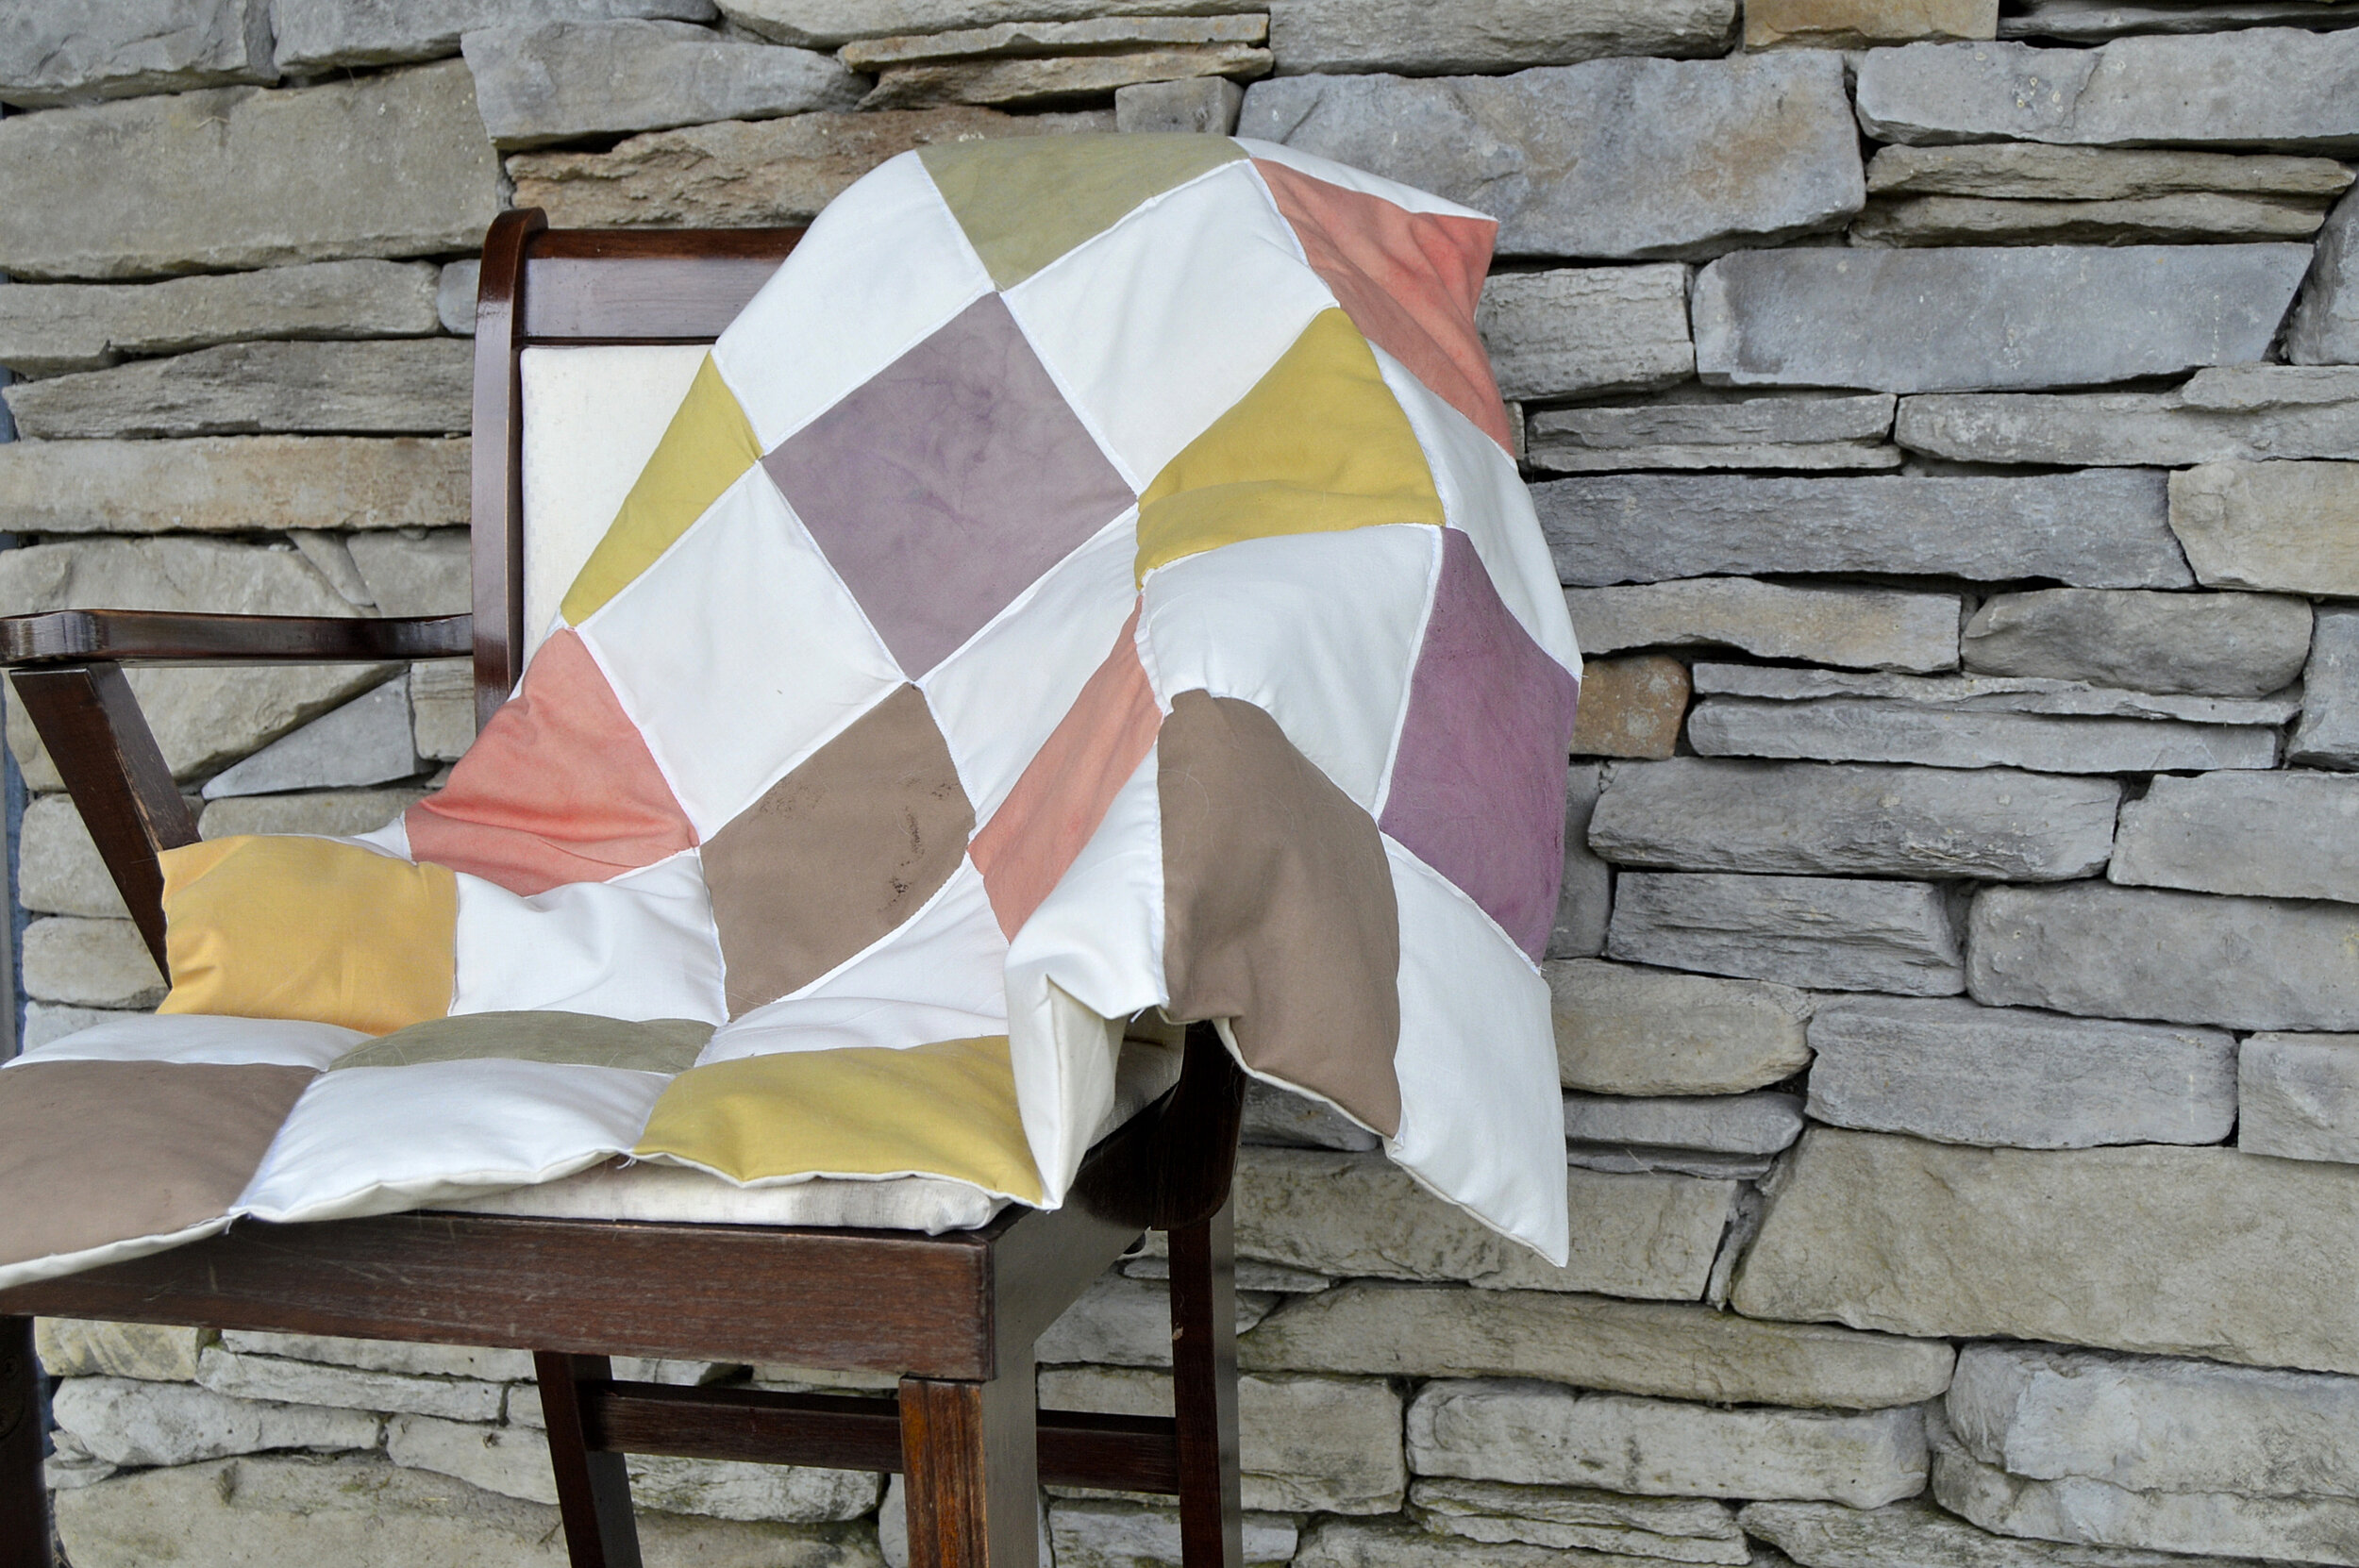
DIY Natural Dyed, Sustainable Mini Lap Quilt

Read the dyeing tips and instructions below to learn how to naturally dye and assemble a gorgeous, all natural lap quilt using our Natural Quilter’s Kit. If followed, all instructions included here will help you create a finished quilt which measures
approximately 30″ x 40 “.
You are of course free to branch out and experiment with your own quilt patterns, designs, or techniques, however, please keep in mind that doing so would result in potentially different finished results than you see pictured, and could require the use of additional tools and materials which are not included in the kit.
I recommend reading through all of the instructions before beginning your project, to familiarize yourself with the process. Natural dyeing can be a bit of a lengthy process, however can be incredibly fun and straightforward once you get used to the steps. It is definitely a journey in and of itself, in seeing how natural pigments react, to all different materials, times, and temperatures, while allowing your creativity and sense of discovery to flourish. With natural dyeing you are always going to get unique results with every experiment. So, take your time, embrace the age old process of harmonizing with all natural materials and plants, and keep your heart open to learning, experimenting, and creating!
To start, here is a quick breakdown of how we will create our finished quilt:
Prepare and Dye our cotton fabric blocks
Cut our dyed fabric blocks to desired size/ shape/ pattern
Sew our dyed pieces together to create a quilt top
Sew our finished quilt top to our backing piece
Insert natural batting
Sew our quilt “sandwich” closed
Admire our gorgeous natural quilt!
Your Natural Quilter’s Kit comes with the following materials:
5 different Natural Dye Powders (Madder Root, Black Walnut, Safflower, Hibiscus Flower, Nettle Leaf)
Soda Ash powder
Aluminum Acetate powder
12 pre-cut squares of high quality 100% cotton quilting fabric squares, measuring 11 inches each.
One piece of high quality 100% cotton backing fabric measuring approximately 35″ x 45″
One piece of 100% wool or alpaca carded batting measuring approximately 30″ x 40″

*Note: Our kit does not come with thread or needles, we recommend using 100% cotton quilting thread. You can choose to sew your quilt by hand or by machine. We also do not include quilt binding fabric (as the quilt finishing method we use in these instructions does not require it), however, again you are free to use whichever binding fabric or method you choose should you want to do it differently.
** For the dyeing process, we also have a list of additional tools and materials (such as old pots, spoons, measuring cups, etc.) which will be seen in the dyeing instructions below. These additional materials are also not included in the kit.
Ok, are you ready? Let’s get started!
Step 1: Dyeing our Cotton Squares
Follow the instructions below to dye your fabric squares. You can choose to dye a few squares of each different color in different dye baths to get a variety of colors as seen on the quilt in the photo. We dyed 3 squares with Hibiscus, 3 Squares with Black Walnut, 2 Squares Nettle, 2 Squares Madder Root, and 2 Squares Safflower.

Before Starting : Safety First When Dyeing
When working with dyestuffs, powders, and chemicals, it is recommended to always wear waterproof rubber or plastic gloves, a dust mask to avoid inhaling fine powders or vapors, and plastic goggles to protect your eyes. Always work in a well-lighted and ventilated area. Read all safety notices and warning labels for each ingredient you work with.
Also remember to keep a dedicated set of tools (pots, spoons, measuring cups, etc.) to be used for Dyeing ONLY and to never use those tools for any other use after they are used for dyeing. Some chemicals and dye ingredients may react to pots or tools made out of certain metals such as copper, aluminum, cast iron, etc. Therefore it is a good rule to always use stainless steel or enamel pots, as well as stainless steel, wooden, or plastic spoons and utensils when dyeing. You can find old pots, measuring cups, utensils, etc. perfect for dyeing, very inexpensively at thrift stores (such as Salvation Army or Goodwill) or garage sales. Here’s a list of additional items you may find useful for natural dyeing:
↠ Rubber or disposable plastic Gloves
↠ Dust Mask
↠ Goggles
↠ Stainless Steel or Enamel Pots (Small, Medium, Large)
↠ Stainless Steel Whisk (Small)
↠ Glass Measuring Cups
↠ Fine Muslin Cloth, or Cheesecloth, (or scrap silk cloth) for straining
↠ Long handle Spoons (Stainless Steel, Wood or Plastic)
↠ Tongs (For picking up and moving hot or wet fiber. Optional)
↠ Digital Kitchen Scale measuring in Grams/Ounces
↠ Heat Resistant Kitchen Thermometer
↠ Plastic Tub for Rinsing dyed fiber
↠ PH Testing Strips (Optional)

DYE INSTRUCTIONS- PREPARING OUR FABRIC:
Weighing, Soaking, Scouring & Mordanting
Before dyeing your yarn, fabric or fiber with natural dyes, you must prepare the goods in order to assure optimal dye absorption and color fastness.
↠ Weighing: It is important to know and record the weight of the goods (yarn, fiber, fabric, etc.) you intend to dye, so that you can accurately calculate the amounts of mordant, dye, and water you will need for your project.
In this project, we can weigh and prepare all of our fabric squares together.
↠ Soaking: After noting the dry weight of your fabric, soak it in water anywhere from two hours up to a day. Soaking opens up the fibers and allows for better dye absorption.
↠ Scouring: After soaking, you need to scour the fabric to remove any oils, starch or other agents possibly left from manufacturing which may impede the dye absorption. Cellulose based fabrics and fibers are best scoured with soda ash.
To scour, fill a pot with enough water to cover the fabric. For every 100g of goods, add 1 ¼ tsp. (5g) of soda ash to ¼ cup hot water, whisk until dissolved. Add soda ash water to pot and stir to combine. Submerge goods into pot, and slowly bring water to 180° F simmer for 30 minutes, rotating goods gently every 10 minutes or so. When done, turn off heat and allow goods to cool in the pot. Rinse the goods in cool water; you can repeat scouring process until the water runs clear or the goods are clean. Move onto mordanting.
↠ Mordanting: Mordanting is the very important process of treating your goods with some form of water-soluble metallic salt which helps to bond the dye to fibers, fabric or yarn. Most natural dyes require the use of a mordant in order for the dye to stay fixed on the goods and not rinse off. There are different types of mordants for different fibers and which give you different results. The most commonly used mordant for natural dyeing plant based Cellulose fibers or fabrics is Aluminum Acetate.
Basic Mordant Recipe for Cellulose Fibers:
You can use this general formula below to calculate the amounts needed. :
For every 100g of dry fiber or goods, add 2 tsp. (6g) of Aluminum Acetate to ¼ cup hot water and whisk until dissolved.
Add the dissolved Aluminum Acetate water to a pot of enough hot (not boiling) water to cover the fabric and stir well. This creates your mordant bath. After creating your mordant bath, add in your scoured, damp fabric, gently submerging them into the pot. Cover the pot to retain the heat, and gently stir to rotate the fabric every 10 minutes or so. Let the fabric sit in the mordant bath for at least 2 hours, leave for an additional 24 hours or overnight for better lightfastness of color.
Next, lift the goods from the pot, and rinse with cool water. Squeeze excess water from fabric and proceed to the next step!
*Note: I you have more than one pot available to use, you can complete the mordanting process at the same time that you extract the dye to save time.
NATURAL DYEING: EXTRACTING OUR DYE
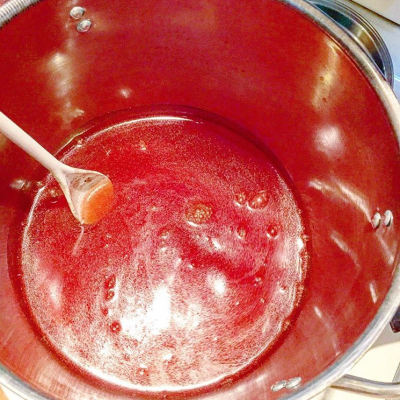
While your fabric is resting in the mordant pot, begin extracting your dyes. When using natural dyes, the pigment and color must be extracted from different parts of the dye plants, such as leaves, stems, bark or roots. These dye stuffs can come as whole pieces or in ground form.
For this project, you can extract each dye color separately and store the extracted dye liquid in old glass mason jars (or other container) until you’re ready to add the fabric to them. You don’t necessarily need to have 5 different pots for 5 different dyes. (The same goes for dyeing your fabric squares. You can dye them in lots according to the number of squares and colors you want.)
↠ How much dyestuff to use? Depending on the weight of the goods you want to dye, most natural dyers follow a formula recipe of using 10% dyestuff to the weight of goods, to achieve medium shades of color. So for example, if you want to dye 100g of goods, you will need 10g of dye powder or pieces. For lighter colors and shades, use a lower percentage, for darker, a higher.
For our quilt project, we will use one whole tube (.5 oz) for each extracted dye bath, which we will use to dye 2-3 squares of our fabric in each color.
↠ To begin extracting, stir or whisk one tube of dye powder into a saucepan with 2 cups of water. Bring water to a simmer, and simmer gently for at least one hour, stirring occasionally and being careful not to burn. You can add some more water if the level gets too low. If you want to extract stronger color, you can soak dyestuff in a bowl or in the saucepan overnight BEFORE simmering. Let the dye extract cool after you’re done simmering, strain it through fine muslin or cheesecloth and save the extracted dye water for your dye bath.
Repeat this process with the other 4 dye colors. Now we can finally dye the fabric pieces!

NATURAL DYEING: DYEING THE FABRIC PIECES
↠ Pour your extracted liquid into a pot and stir together with enough water to approximately cover the fabric squares you wish to dye in that color. (We used 2 cups of water plus the dye extract liquid to dye four fabric squares in that color at once).
↠ Submerge desired number of squares into the dye bath. Turn on the heat low, and slowly bring dye bath up to a simmer. Simmer the fabric for at least 30 minutes to an hour, rotating evenly and being careful not to let it burn. (You can then turn off the heat and leave it to soak overnight if you wish for even stronger color.)

FINISHING:
Turn off the heat and allow bath to cool. Remove fabric from dye bath and gently squeeze and rinse fabric in clean water. Allow fabric to dry (or throw it in the dryer!). Now get ready to sew!

Step 2: Planning our Quilt top Design
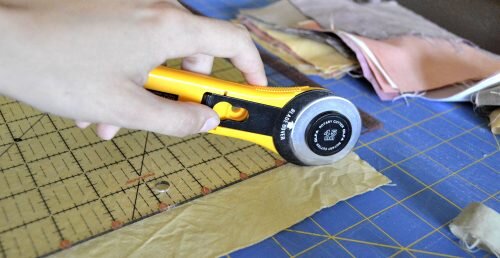
Now we get to the fun part! Designing our quilt top. At this stage, you can leave the squares as the same 12 large 10″ squares and arrange them into your 30″ x 40″ rectangle quilt top, or you can cut the ten inch squares into smaller quilt block pieces to create any number of different quilt block designs. For our quilt, we cut each of our ten inch squares into 4 smaller 5 inch squares to give us more squares of colors to piece together. (We also added some extra undyed white squares to make the design more interesting)

The fabric squares you received in your kit were purposely pre-cut to measure 11″ x 11″ exactly. This is because after the dyeing and drying stage, the fabric will have shrunk to less than that, and as you cut the fabrics and sew each seam, some length will be lost.
This step is where you can trim any loose threads and shape up your squares back to 10 inches (or whatever size you want them to be). I find this easiest to do with a cutting mat, quilters rulers, and rotary cutting tool. These can be found at your local walmart or hobby and craft store. If you’d like to do it the simplest way, then you can never go wrong with a sharp pair of scissors, a pencil or fine point marker (to mark your cut line), and a ruler or measuring tape.
Be sure to iron your fabric squares first before cutting!

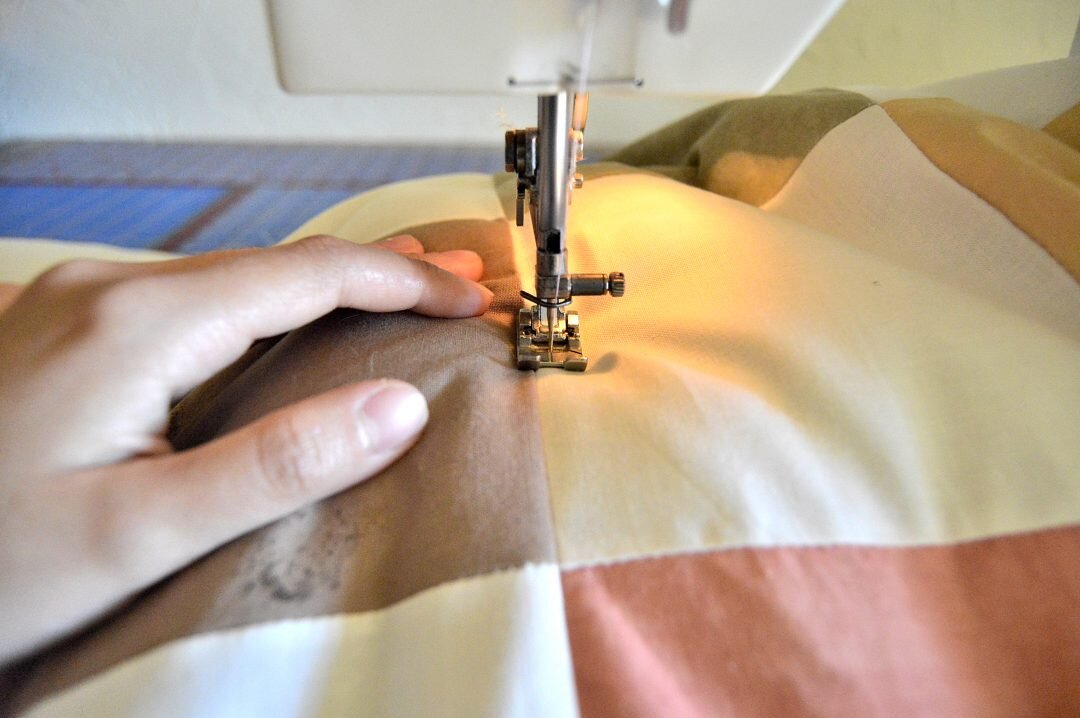
After you’ve cut your squares and arranged them in a pattern you like, you can begin piecing, pinning, and sewing them together to make your quilt top. You can sew them by hand or machine. There are many quilting and piecing tutorials online to help you learn the proper way to piece and sew a quilt top. We sewed our pieces together on a quarter inch seam edge.

After you’ve finished sewing together all of your cut pieces to create a quilt top, we can now assemble the quilt!
Step 3: Sew the quilt top to the backing fabric
Take your finished quilt top (iron it again first!) and lay it over your piece of backing fabric. We purposely included a backing piece that would measure slightly larger than the finished quilt top. Trim the backing piece so that it matches the size of your quilt top. Pin the backing piece to the quilt top right sides together (wrong sides out). On a quarter inch seam, sew them together around three of the sides, leaving the fourth side open so you can turn the whole piece back right side out.

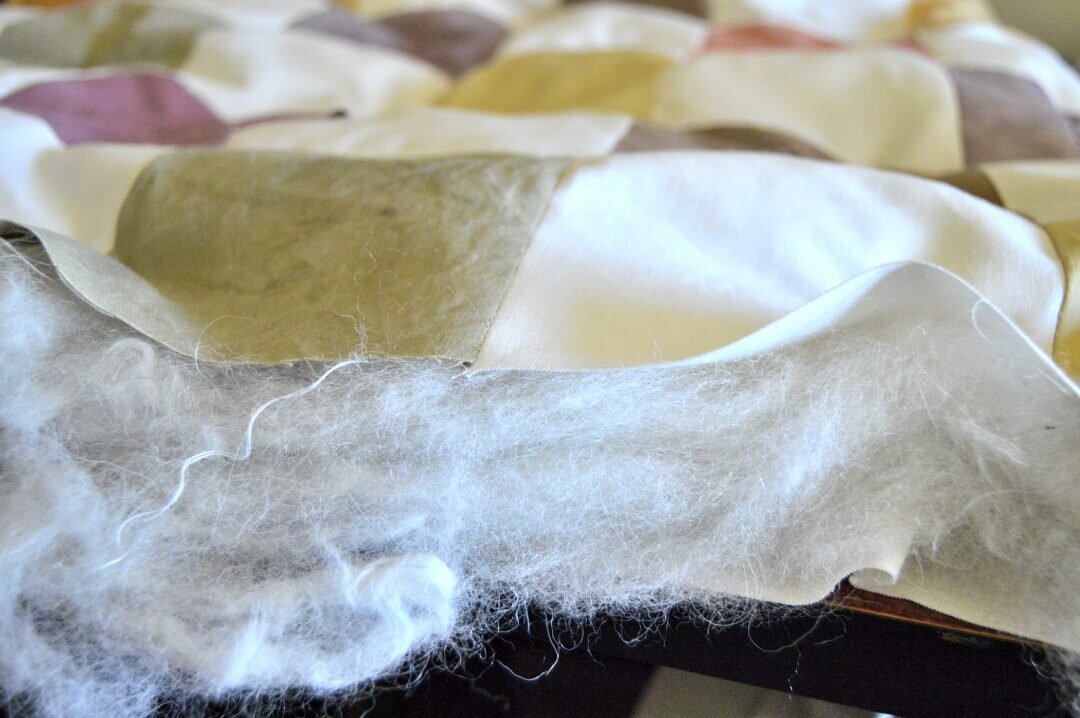
Step 4: Place the Batting
Before turning the sewed quilt top and backing piece back to the right sides out, lay the batting piece on top of the quilted top side. Trim it around to make it the same size as the quilt if need be.
Carefully, trying not to let the batting move from where it is sitting (you can use a few basting pins to hold the batting to the quilt top), turn the quilt top and backing right side out again so that the batting remains laid out evenly on the inside. You can reach in and smooth it flat inside the quilt “envelope” before moving to the next step.
Step 5: Sew the quilt closed & quilt a pattern across
Now you can fold the two open edges (quilt top and backing) and iron them on a quarter inch seam, and then sew across to close the bottom of the quilt. Place pins across the whole quilt and sew all the way around the outside edge, as well as across the whole quilt to hold the batting in place. You can sew something simple like lines or squares across the quilt, or complex patterns across. Again, there are many online tutorials on quilting and quilt finishing techniques that can give you inspiration and further guidance.
Step 6: Enjoy your beautiful quilt!
Congratulations! You’ve completed this magical journey of natural dyeing and created a sustainable textile piece from start to finish! I hope you’ve enjoyed learning the process of utilizing natural dyes to color fabric sustainably, and encourage you to continue learning and experimenting with the magic of plants.
If there is any part of the process you find unclear and need any assistance with, feel free to contact us and shoot us a message here. We will try to help however we can!